
As time has marched on and our build experience has increased, we have updated the information on how to soundproof a basement in this blog on 11/1/19.
If you want to know how to soundproof a basement you need to approach the problem from the top down. Your ceiling to your basement is really the floor of the next level above you. The walls usually block or poured concrete which provides another barrier layer. To your sides, behind the sidewalls, you have lots of earth. Earth is an excellent barrier material, especially for lower frequencies.
What Is Your Basement’s Use?
You must first decide what your intended use of the basement is going to be. For the sake of discussion, let’s assume your basement usage will be as a small project studio. No musical instrument or vocal playing and recording, not a live room. We will be monitoring mixes through playback monitors. Let’s make your top playback level around 85 SPL. for the purpose of this discussion. Let’s focus on your ceiling which is the floor for the room above. This is the room you want to keep energy from transferring out of your basement and into.
Barrier Technology
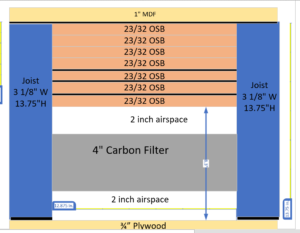
You will have to keep as much energy within the basement as you can. To do this, you must employ sound barrier technology for the ceiling. The best way to make a barrier is to laminate different layers of different density materials. You can use plywood, MDF, or other composites. Arrange the materials in a manner that starts with say a 1/2″ solid piece as the center and build a multi-layered sandwich of materials out from that core piece. This layering technique is directly dependent on the frequency and amplitude of the noise created within the basement.
Barrier Sandwich
Here is an example from a recent project. Take a 3/8″ of plywood and stack it on top of the 1/2″ solid MDF core. MDF stands for multiple density fiberboard. You need the commercial variety for this project. Before you attach them together, separate them by placing a layer of vibrational damping compound between the 1/2″ MDF core and the 3/8″ plywood. Next, use another piece of MDF at a 1/4″ thickness and place it on top of another layer of vibration damping compound. Each layer of different densities is damped by a compound. Your goal is to end up with your “barrier sandwich” at 6″ thick.
[bctt tweet=”Do You Want To #Soundproof Your Basement? Check this out! #homestudio”]Vibration Reduction
As vibrations move through each layer of material they must go through different thicknesses and also must go through the vibration damping compound layers. You want to make the vibrational journey as difficult as possible. Vibrations equal noise upstairs. This is the reason for alternating different materials with different densities. You want to reduce the vibrations that strike one side of the barrier from reaching the other side. The goal with any vibrations is to reduce their rate and level as the vibration passes through multiple layers of materials of different densities.
Barrier Installation
Once you have your barrier built, you must install it. It will not be easy because you will have to lift it into place and secure it. It also must be damped or decoupled from the existing basement ceiling, so that once again you minimize vibrations. This should be left to a professional who has the tools and equipment to do that. A 4′ x 8′ barrier sandwich could easily weigh 1,000 lbs. You have to make sure the additional mass can be supported by the existing structure. The last thing you want is for the existing structure to fall down with the increased load.
Double Wall Approach
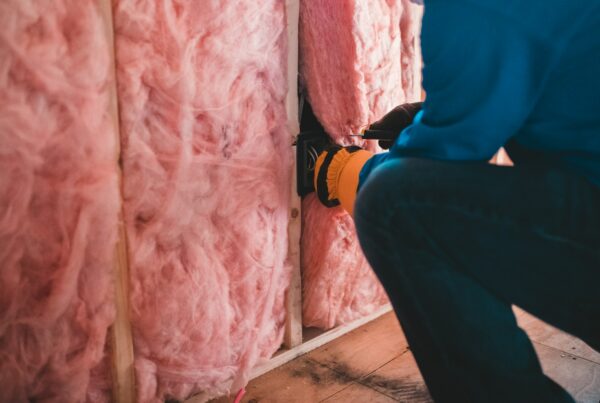
Another way you can achieve sound transmission loss is by building two walls that do not come into contact with each other. You will be building two 2′ x 4′ walls with an air space between them of at least 4″. These two walls will be standard interior walls with 2″x 4″ lumber covered in drywall. It is an easier build and installation but care must be taken that each wall built is mechanically isolated from the other. Once again, you want to throw as many barriers as you can against airborne energy and the air space between each wall is another barrier. However, this design has its limitations. It does take up a lot of space and is only good for frequencies above 125 Hz.
Inside Basement
The inside of your room or basement already has walls that are concrete reinforced with earth surrounding them. We are not going to improve upon the density or sound isolation characteristics of this system. Instead, you will need to focus on the dimensions inside those walls to discover any low-frequency issues that will be produced by the basement’s dimensions. Once you have determined what the dimensions are that you will be using, you will then go to work on taming the low-frequency resonances first and then dealing with middle and high-frequency reflections off of the wall surfaces.
Usage
The usage of the space must always be taken into consideration. What you do within the room determines how much energy will be produced within the room. The amount of energy produces the number of problems you will experience. The more problems you have the more treatment requirements you will be faced with. If you are using your space for a live room where you will be playing instruments and recording, your absorption and diffusion treatment requirements will be different than if you are using the space for voice overwork.
NB: You can learn how to measure low frequency pressure areas (room rooms) and treat them in some free training videos I have made. Simply sign up on this page for instant access to the free room acoustic training series.
Low Frequency Sponges
Once you have determined what low frequencies are going to cause your problems, you can design and build low-frequency diaphragmatic absorbers that will absorb at the lower frequencies you need to deal with. If you are fortunate and do not have specific low-frequency resonances to contend with you can build or purchase broadband diaphragmatic absorber that will absorb energy over a broader frequency range. You will have to take the dimensions of the room and then determine the frequency and amplitude of all the issues within that room. Each surface area contributes its own set of issues based upon the dimensions of the room.
Concrete Wall Reflections
Sidewall reflections off of the basement walls may be wanted but most will not. Sound “borrows” sound quality from the surface that it strikes. If sound strikes the glass, one gets glass sound. We all know this sound. This is the sound we hear in our vehicles. If sound strikes concrete, we get concrete sound. It can be harsh and brittle and increase the reverberation times in our room. The tonal quality of your middle range frequencies is directly determined by the materials that your room is constructed with.
Concrete Mold
Acoustic Foams
Sidewall reflections can be dealt with by reducing their strength through the use of acoustic foams. They are lightweight and relatively inexpensive. Make sure you use a foam that has a smooth absorption curve below 500 Hz. This is the frequency range for most vocals and you want absorption in that range to be as smooth as possible. Most foams currently in the marketplace show poor performance below 500 Hz. Look at our studio pro foam which was designed with music and voice as its objective.
https://www.acousticfields.com/product/acoustic-foam/
Sound Compromise
Keeping sound from entering and leaving your rooms is not an easy task. The best we can usually hope for is a compromise. We reduce the energy within your room using absorption so that your neighbors do not hear too much of it. If the noise is coming from the outside, we build barriers to try and stop most of it but we can not usually get it all. Our basements have walls that have good isolation but we need to address the ceiling which is the floor of the rooms above us.
I hope this explanation helped. Please leave any comments below so I can get back to you. If you have any questions on how to soundproof a basement please don’t hesitate to contact me. Alternatively, if you would like a free analysis of your basement, please complete the form on this page https://www.acousticfields.com/free-room-analysis/ Don’t be afraid to hit those Facebook like, Google+ and Twitter buttons on the left-hand side so other people can see this post. And if you want to learn more about this subject please sign up for our free room acoustic treatment videos and ebook which provide step by step instructions. Get instant access by signing up now.
Thanks


what do you do if you have cement ceiling and block wall to keep down echoing
E, The issue you are having is called reverberation. It results from reflections off of those hard surfaces. To lower your Rt-60 times down to a level that is below nuisance, you must use sound absorption technologies. Open-celled foam would be an option. I would need to know much more about your room size/volume/usage in order to recommend type /amount / position of foam treatment. Fill out the information in this link. Let’s take a look at your room. https://www.acousticfields.com/free-room-analysis/