
We have had clients build over 1,000 of our sound diffusers. We have updated this blog on 11/9/19 to reflect the science and experience of those 1,000 DIY sound diffuser builds.
Last week someone wrote in to ask how easy it is to make a homemade sound diffuser using our DIY plans. They are not difficult to build but you must have the proper tools and workplace. One of the most important things you need access to is a table saw. You will need a minimum of three years of experience running a table saw. People try to use circular saws and do things like that. I would strongly advise against this as all our plans are designed with right angles and you need straight, consistent edges that only a table saw can produce. Once you have the tools and shop area, you can begin to build your material list.
Use Real Wood For Diffusers
You will need real wood to build your diffusers. Do not use MDF. MDF absorbs too much energy and will not allow the diffuser to work well at higher frequencies. If you can not find solid wood that is available in your area, you can use veneer wood. Wood is the best material type for diffusers. Stay with your softer woods such as basswood, pine, birch. These softer woods will produce better tonal qualities for middle-range frequencies where diffusers work. Remember that diffusers are a middle and high-frequency range tool. They are not a low-frequency tool. Low-frequency tools are diaphragmatic absorbers and resonators of numerous types.
Quadratic Diffusion
We use only quadratic diffusers. Quadratic diffusers are the only real true diffuser type that satisfies all 5 criteria for a diffuse sound field. We have three sound fields within our room. We have floor to ceiling, sidewall to sidewall, and front to rear walls. Only quadratic diffusion with its series of wells or troughs that operate at quarter-wavelength rules. The width of each trough or well operates on a half wavelength rule. Most quadratic diffusers work from a frequency range that starts around 200 Hz. and goes through 3,000 Hz.
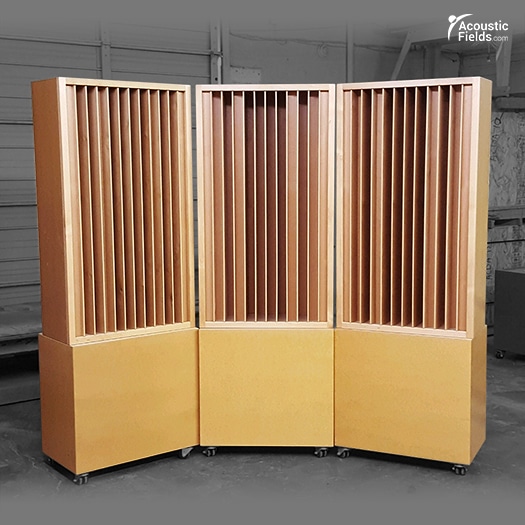
Quadratic Diffusers by Acoustic Fields
Preparation Phase
Once you have selected your working area with the proper tools and working space, you have selected your wood type, your next step is to do the preparation work and cut all the pieces you will need for your DIY sound diffuser build. You must cut first and assemble last. There are many piece types. There are the vertical well dividers that separate each well or trough. There are the horizontal well dividers that close the well or trough up and they are each at a different distance from the front edge of the diffuser. This distance in each well or trough must be built to correspond exactly to the well or trough depth dimensions in the drawings. This distance is critical since it is that distance that creates the proper frequency/octave band that the diffuser is designed to produce.
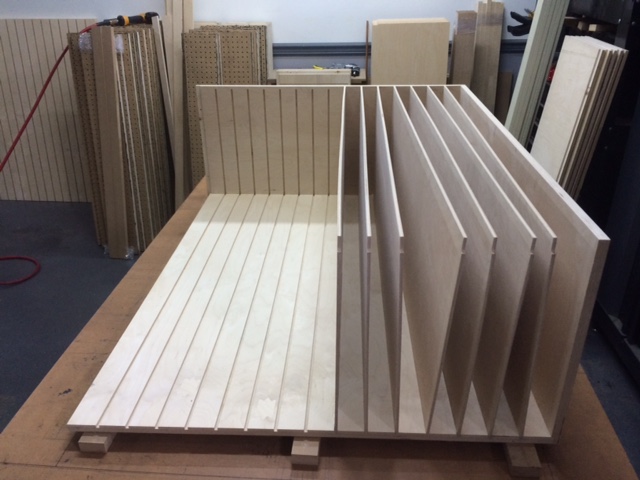
Vertical Well Dividers
Dado Straight Edges A Must
Cut your dados exactly. The vertical well dividers must pressure fit inside the dado with a bit of glue to hold each piece together. You must dado the top, bottom, and rear pieces. The dados in those areas are critical because they hold the wood in a more rigid fashion thus creating a higher tensile strength with the unit. Over time small wood tends to warp. With the dados on the top, bottom, and back piece, we have a good chance of no warp over time. We do not want warp. Warp or bend in the verticals has a negative impact on frequency response. That’s the last we need in an acoustic tool to manage frequency response.
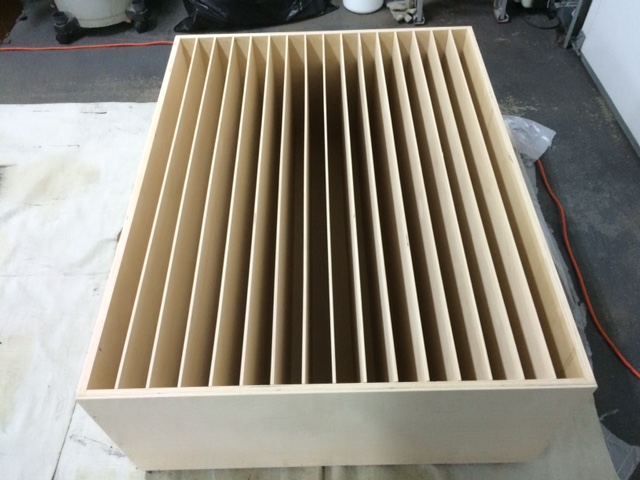
Vertical Well Dividers Pressure Fit into Dado
Glue the verticals in place first to the back piece that you have already dado. They should stand in the dad on their own with no glue. Put glue in the dado and let sit overnight. Put some weight across the verticals as the glue drys. This will force air out of the glue and create a tighter bond. Install the horizontals between the verticals. It’s best to even dado the verticals to accept the horizontals. Its a small dado sine the horizontal piece is 1/2″ thick at the most. Glue the top and bottom and let dry. Select a clear coat finish to protect against dirt and moisture. Do not paint or use MDF. Both have a negative impact on frequency response.
This video shows us assembling one of our DIY sound diffuser kits.
Thanks
Dennis