Two Ears, Two Microphones
Creating a quality stereo image in our two channel recordings starts with selecting the correct microphone for the recording task. Along with the microphone selection, must come its proper positioning in relation to the sound source being recorded. Are we interested in just the sound source whether instrument or vocal? Do we want to include the sound of the room in our recording along with the chosen instrument or vocal? What sound objective we are after, determines how we position our microphones during the recording process. Microphones are our ears.
Stereo Image
A stereo image can create depth, size, separation, and definition. These elements are present in a live event and our goal as recording engineers is to capture all of these elements in a live event. We are not talking about studio electronic manipulation of the signal, but using different microphone set up and positioning techniques to capture the detail in all our music sources and the room ambiance in which we are recording.
Recording Techniques
There are three basic recording techniques for microphones, coincident, near coincident, and spaced pairs. To achieve the best results, one should always use matched pairs within the same brand. Matched pairs means that the frequency response, recording pattern, and a host of other electronic variables are matched as closely as possible during the build process by the microphone manufacturer. We want to make sure both of our ears are hearing the same way.
Coincident Pair
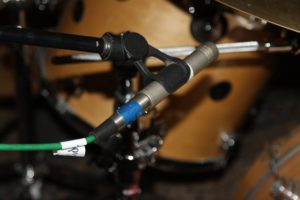
A coincident pair of microphones is two directional microphones positioned on top of each other. The goal is to get the diaphragms of the microphones as close together as possible. Each microphone is then angled from 90 degrees to 135 degrees. The acoustic goal is to make sure all sounds reach the diaphragms at the same time. With this physical set up, we ensure that there is no phase cancellation going on with our recorded signal. In this set up, the microphones will respond to changes in pressure exerted upon them by the sound source and it is this amplitude change that our brains will figure out each instrument or vocals stereo position based on the amplitude changes that are recorded.
Near Coincident
With our near coincident pair arrangement, we are not focused so much on the narrow more defined stereo image with just amplitude fluctuations in our signal. With the non coincident pair set up we introduce a time cue into the recording process. Sound travels at a constant speed. Depending on the distance the sound source is from the microphone will determine when that particular sound arrives at the microphone position. Objects that are farther away from the microphone will sound farther away because the signal reaches the microphone at different times. Thus, we can establish each sound source’s relative distance and position in the stereo image.
Spaced Out Or AB Positioning
The third technique is termed a spaced out or AB positioning. This technique is not as focused and defined when it comes to our stereo image but rather more diffused elements of our music and vocals is captured with this microphone positioning technique. A common example of this technique is to take a pair of cardioid microphones and position them at 45 degree angles to each other. We want a little overlap with the microphones in this position, so we place the diaphragm of one microphone on top the other.
Strong Stereo Image
This method will provide a very tight and stable stereo image with definition and a reduced size to our image. Since we do not have to deal with phase issues with this set up technique, we have a tight center image that almost resembles mono and will be quite compatible with other mono signals in your recording chain. To achieve a wider stereo image we can separate the diaphragms using a wider angle all the way up to 135 degrees.
Non Coincident Set Up
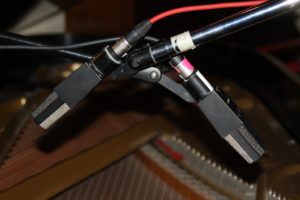
If we take two matched cardioid microphones and place them about 7″ apart and the angle each one at 60 degrees off axis, we have the proper non coincident set up. If you look at this microphone position technique from the side, it looks like you have formed a wide letter “V”. This “V” positioning technique allows for more “air” or spaciousness in our recording. Thus, with this microphone positioning technique, we have a strong stereo image that is focused and defined along with the varied time clues from signals arriving at different intervals to our microphones that allow for more room sound to enter our recording.
AB Positioning Set Up
The third technique is called a spaced our array of AB positioning. With this method, microphones are placed approximately 12″ apart and on the same plane. The amount of space between the microphones is determined by how large of a sound stage present in the session. A good rule of thumb is to position the microphones at one third to one half the distance of the sound stage. Omni directional microphones are usually the microphone of choice with this technique, but one can use any type. This method is commonly used for choirs, orchestra, or chamber music applications where we do not need so much focus and definition but more of a broader more diffused sound.
AB Set Up Room Issues
To correctly apply the AB positioning technique the engineer must be aware of an acoustical issue termed critical distance. Critical distance is that position in the room where the direct sound from our source, the sound that travels in a straight line from the source to our microphones, and the reflected energy from our room’s boundary surfaces are equal. The more reverberate the room, the closer the microphones should be to the source. One can locate the drums closer to the source when you are recording a group of instruments such as a drum kit or small assemble. With this positioning array, we will have phase issues, so we need to check our signal in mono to be sure there is continuity.
Binaural Hearing
Microphones were created to mimic the hearing process. Our ear drum vibrates in response to sound pressure exerted upon it. Microphone diaphragms vibrate in response to sound energy that strikes them. In order to capture sound in a way that our ears will recognize as a real recorded event, we need to position our microphones in manners that receive the time and frequency information that balances the direct and reflected energy within our rooms.



We use broadband absorption in the two most critical frequency regions in small rooms. Our Diaphragmatic absorbers, ACDA series, have…
Interesting web site and provocative introduction. Please check your copy for typos, otherwise nicely presented. I would like to see…
There is no such thing as soundproof anything especially carpet. Low frequency noise transmission requires a permanent construction fix with…
Hello Dennis! Our neighbors put a Ice Bath in their garage which is right below our bedroom and the Low…