Soundproofing A Room – Stop Noise In 5 Steps

If you plan on soundproofing a room, there are many variables you need to consider. Careful thought and consideration must be given to the acoustic goals you are trying to achieve. With noise transmission issues, you must measure the noise first and foremost. Without noise numbers, one is guessing and guessing with noise is foolish. If you guess wrong, which most do, you will have to tear it down and start over.
In this video I breakdown the principles behind how you should go about soundproofing your room.
Find Noise Location
Where is your noise coming from? How much noise is there? How much of an issue does the noise present? What materials are you going to use to lower the noise levels? How are you going to assemble the materials so you do not waste money and ensure you achieve your acoustic goals?
You must follow a step by step plan to insure that you achieve maximum results with the minimum of dollars spent. Let’s first decide how large of a noise issue you have. Let’s start by measuring it.

Step One: Noise Measurements
First you need to know the amount or quantity of noise you are dealing with if you are soundproofing a room. To do this, you have to measure the noise. That noise number will go a long way to helping you through steps 2-5. That number will also assist you in determining what type of material you need to use when soundproofing a room in an apartment.
After all, you don’t want to buy and use material you don’t need, especially if it isn’t going to help you in soundproofing a room. You also do not want to cause more harm and add to your existing noise levels by doing something that costs more money and will never work for the acoustic goal you have in mind.
Sound or noise is all about frequency and amplitude. Frequency is expressed in hertz. Amplitude is sound pressure and can be measured with a number assigned to it. This number will give you a start point to work from when you’re soundproofing a room.

For an inexpensive measurement tool, go to the App Store and download an RTA. RTA stands for Real Time Analyzer. An RTA will measure sound pressure in decibels along with the frequency that is producing the pressure. It will tell us the strength of the frequency and helps tremendously in the process of soundproofing a room.
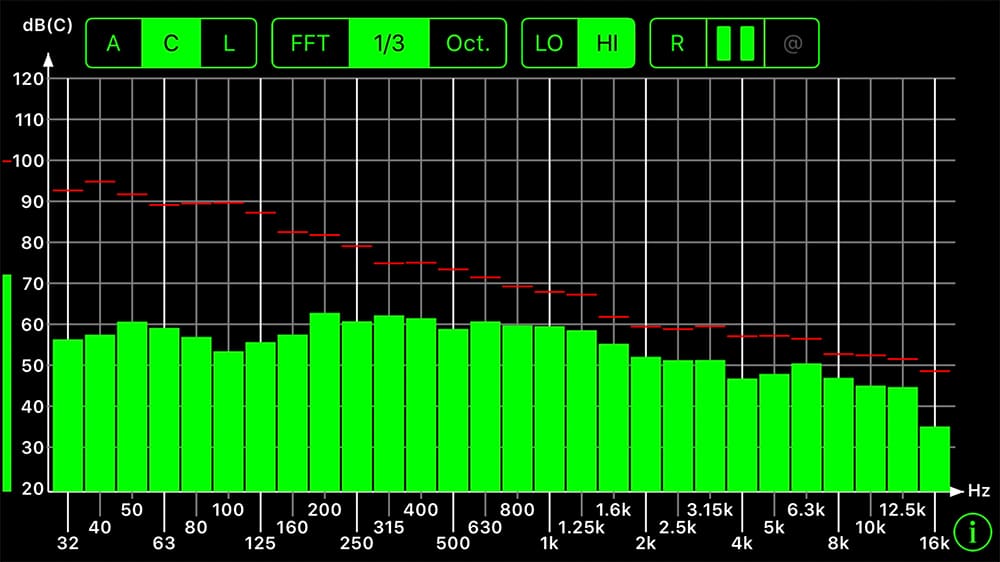
Measurement Procedure & Numbers Over Time
Place the RTA in your room and measure your room during all times of the day over a one week time period. Take 2 – 3 measurements per day. Measure both frequency and amplitude. Repeat the process outside. Record the noise levels in the neighborhood that record your data on our online data sheet and send it to us. We will design the appropriate barrier for your noise numbers. With noise you do not want to spane one dollar more than you have to to stop noise transmission. With barrier (noise) dollars, you never get them back when you sell.
Examine all the numbers you have recorded throughout the day. Locate the level you find acceptable. Give it a number. This is the number that indicates the sound pressure level you need to soundproof for. Anything over that number, you should consider noise. Now the noise has a number and can not hide. If you like your room at 70 dB and your room is 80 dB, because of your neighbor’s stereo for example, then you have a 10 dB noise issue. Now you know what you are up against if you’re planning on soundproofing a room.
Step Two: Inside vs. Outside Noise
Where is that 10 dB noise source coming from? Is it coming from outside your room? Determining the noise source location is critical. It tells you what type and how much treatment you must use when soundproofing a room properly. If your 10 dB noise issue is originating from a source outside your room, you will need to employ barrier technology. You must put a barrier between you and the noise source.
If your noise issues originate from within your room, you must use sound absorption technology to deal with that particular noise level. This is the point where the nomenclature “soundproofing” divides. Now we are getting to the nuts and bolts of the problem. On one side sits barrier technology and on the other, acoustic treatment within the room. Two different technologies to treat two different problems.
This video I made helps explain this issue in greater detail.
Step Three: Which Technology To Use
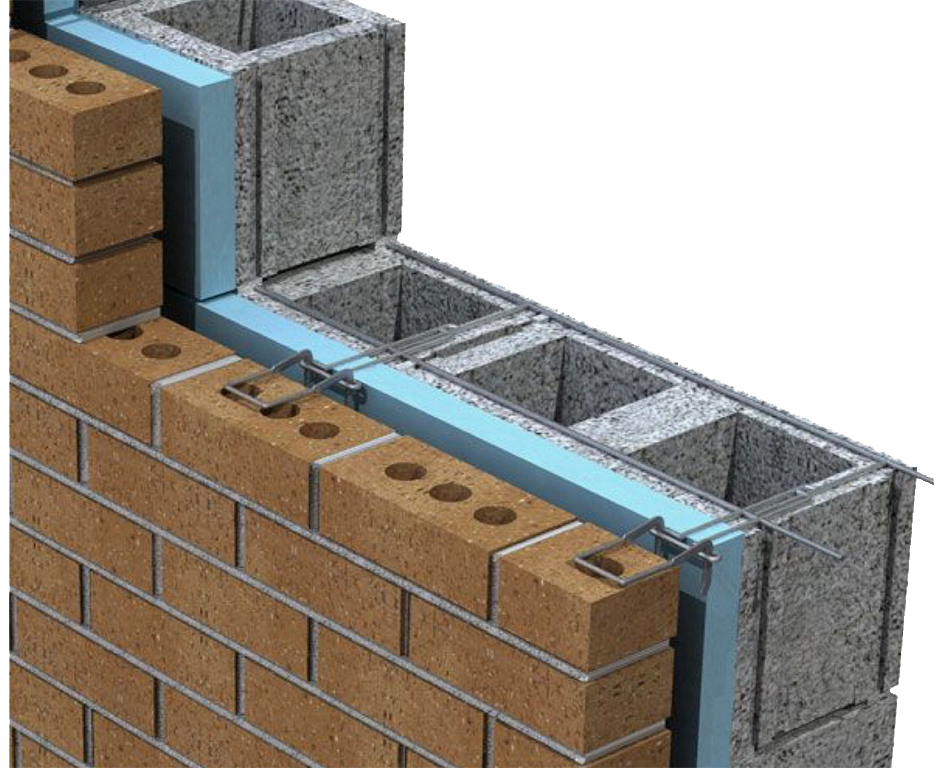
To stop 10 dB of noise from your neighbor’s stereo system, you will need to put up a sound barrier between you and the stereo system. To accomplish this, you must build a wall against the noise. This is a special type of wall. It is a wall comprised of many different layers of materials carefully arranged to minimize vibrations because all noise is caused and produces vibrations. You must separate your wall from your existing wall that is between you and your neighbor.

Your existing wall can actually help you with your noise issue. You must use air as a material and many other materials with greater densities in certain amounts. Construction of your barrier wall and any barrier technology should be left to a professional. A professional knows what works and what doesn’t. He or she can save you a lot of time and money when you’re soundproofing a room. They don’t need to use trial and error with your money.
Inside Room Noise & Absorption Technology
If your noise levels are caused by noise producing technologies inside of your room, you can eliminate or turn down those devices. You can put those devices into sound proof cabinets. If that isn’t an option, you can add absorptive materials using the process of absorption. The soundproofing of a room can be challenging and the sound absorption technologies are numerous and come in many forms. There are foams, panels, and chairs. Yes, chairs depending on their thickness and material type can be affective lower frequency absorbers.
Most absorption technologies come in a panel type of arrangement and can be hung on existing walls to absorb excessive noise energy from within your room. This will deal with all types of middle and high frequencies. You can use design frequency specific, low frequency absorbers. If your excessive noise levels from within your room contribute to your 10 dB noise issues you can minimize these issues using absorption technologies which will be much cheaper than trying to stop the noise from your neighbor’s stereo from passing through your walls using barrier technology.
Step Four: Treat the Whole Room
When soundproofing a room, barrier technology must be used throughout the whole room. You cannot just use one wall, such as the wall between you and your neighbor. That wall is your starting point but you must treat all the room boundaries because noise is like water. Noise will “flow” to the weakest point in your structure.
Barrier technology must be consistent and work together as a system. Even a small crack between your existing wall and your new barrier wall can have large acoustic consequences and negate all of your efforts when soundproofing a room. Absorption technology to handle the excess energy in your room, must be placed on at least 60% of your room walls and even the ceiling. Treating one wall is a good start, but to achieve your acoustic goals, you must treat 4 out of the 5 room boundary surfaces.
Step Five: Voicing The Room.
Science can take you only as far as you are willing to assist it. You must make changes through barrier technology and absorptive technologies when soundproofing a room. You must then live with the improvements you have made over a time period. As you are living with your changes, you need to re-measure again the new pressure levels using your dB meter.
How did you do? Did you reduce the noise levels from both outside and inside your rooms? Do your current measurements measure and indicate what you are acoustically after? If not, you now know the power of what you have done and how well it worked towards your goal of soundproofing a room or lowering the noise from either inside or outside your room. This knowledge will serve you well in your efforts to capture more “dBs” in the future.
In Summary
You can absorb bass energy in your room, so it will not carry into adjacent rooms. You can absorb excess vocal and music energy, so your neighbors do not hear you. Keeping outside noise outside, requires structural add-ons to your existing walls. Our activated carbon filters, installed between the studs in a remodel or new construction scenario, can turn your walls into huge bass absorbers. Adding our proprietary acoustic foam to inside walls can minimize noise levels and reduce the amount of sound leaving the room.
Please feel free to browse through our range of resources about soundproofing a room at your leisure. Our ACDA series, Absorber Wall Series and Sound Barrier Technology are ideal for your needs.
I hope this explanation helped if you are soundproofing a room. Please leave any comments below so I can get back to you. And if you want to learn more about this subject please sign up for our free room acoustic treatment videos and eBook which provide step by step instructions. Get instant access by signing up now.
Soundproofing FAQ
Can I Partially Cover A Surface To Soundproof It?
How Can I Test A Soundproof Job?
What is the cheapest way to soundproof a wall?
Can you soundproof existing walls?