We have updated this blog on 11 / 9 /19 to reflect current low-frequency technology changes.
Sound Pressure And Reflections
Room acoustic issues are many and to most people too many and too confusing. To really simplify things and take all the science and combine it with practical reality in our rooms, we can break small room acoustics down into two main areas: sound pressure and reflections. Working knowledge of these two areas will go a long way to understanding your particular room noise issues and how to treat them.
Sound Pressure
Sound pressure is interjected into the room through many sources. Speakers, instruments, and vocals are all energy-producing sources that put sound pressure into our room. Some of that energy will fit into the room with its respective dimensions. Some of it will not. Frequencies below 100 cycles or Hz., will not fit and here is where our understanding of sound pressure in small rooms will serve us well. A 100 Hz. wave is 11′ long. You must have at least 11′ in a room’s length, width, or height for the 100 Hz. wave to fit into the room without producing pressure distortion. Most rooms will allow for the 100 Hz. wave to fit into the width or length but the ceiling height is usually the smallest of the three and thus produces the most distortion.
Wavelengths
The physical length of sound pressure energy within our rooms is a critical factor in determining if certain frequencies are going to cause pressure or modal issues. If we take a 30 Hz. the wavelength, we know that by dividing the speed of sound 1,100 (rounded) by 30 Hz., we get a length of the wave at 30 cycles is 36 plus feet long. Since most rooms do not have that dimension or even close to it, we are faced with the unwanted pressure this distortion causes.
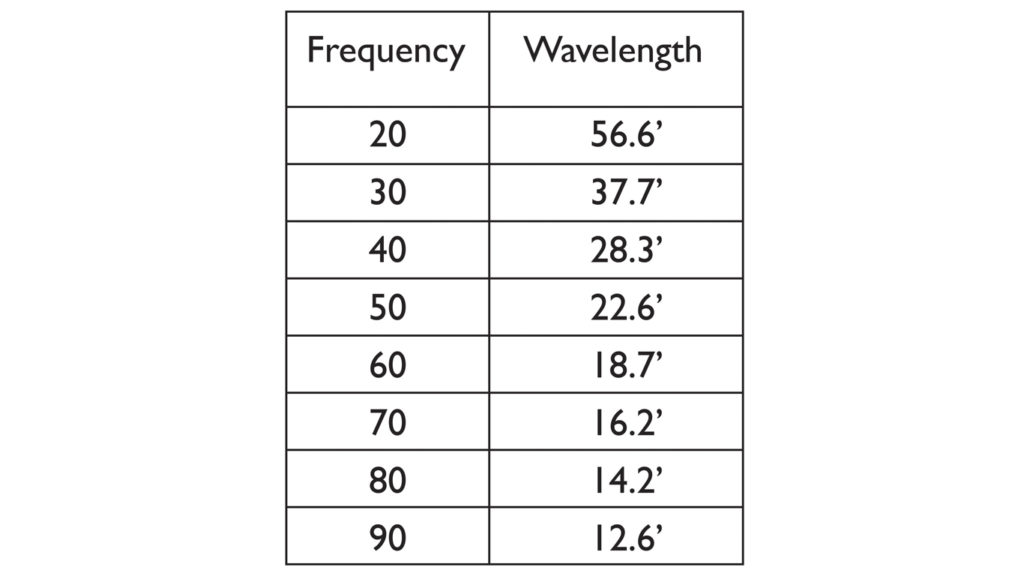
Frequency Vs. Wavelength 20Hz – 90Hz
Too Big Too Fit
How is this 36′ long wave going to fit into our 18′ long room. It is not but part of it will. The part that won’t fit but in this process, it will express its discomfort and set the air in the room at certain locations to start moving. This excess pressure, air movement, produces room modes at frequencies that are not comfortable with the room dimension. These room modes occur all over the room. They can extend from floor to ceiling, sidewall to sidewall, and front to rear wall. It is always a balancing act to get the long waves of low-frequency energy to fit into the room size and volume.
Smother Or Exaggerate
Room modes can smother or blur certain frequencies that lie with the frequency domain of the resonance. Yes, each resonance has its own frequency response curve. A room modal resonance can also exaggerate or boost certain frequencies that are falling within its frequency response curve. We have all heard the “bass boom” in our rooms. When a certain bass note is played and activates the resonance, we hear a boom or maybe more appropriately a “bloom”. For the length of the resonance life, we will not hear any other frequencies at that room location. Room modes will be at numerous locations within our room and can be as close together as 18″ apart.
Familiar Noise
You know that low-end problem in your room. The one you are always working around with every song. That room resonance that appears at a certain bass note. You know the one. It’s in your room and its always in the same location. It’s not leaving, just play another song. Stop working around it and eliminate it. Find its location, we can help, and treat it with a diaphragmatic absorber which is the only technology that will have the strength to absorb the excess sound pressure at a rate and level necessary to make a sonic impact.
6 Step Procedure
To deal with low-frequency sound pressure issues and reflection management, we need to follow a five-step procedure. Step 1 involves identifying the noise issue. Let’s call low frequency, room modes noise for sake of discussion. It will make it easier. Step 2 helps us find the location of the noise issue. Step 3 is identifying the sound absorption or diffusion technology that we will use to treat our noise issue. Step 4 involves installing the technology in a manner that does not compromise any other part of the room and finally, step 5 involves critical listening tuning to make sure we have treated the noise issue effectively.
Step 1 – Identify The Noise
To deal with excessive room sound pressure from wavelengths that won’t fit into our rooms, we must first find out what frequency is causing the noise issue. Download a frequency generator and connect it to your amplifiers then through your speakers. Find 10 Hz. – 200 Hz. generator at this link: http://www.audiocheck.net/audiotests_frequencychecklow.php. Start at 30 Hz. and move frequency by frequency through 80 Hz. Write down each frequency that does not sound quite right. There may be too much of it. They may be not enough. Sit in your listening chair and do the sweep. Let each frequency play for a few seconds. You will get an idea of how your room handles energy. Write down every frequency that does not sound clean and balanced within the sonic presentation.
Step 2 – Find Noise Location
As you do your frequency sweep, pause at each frequency and walk around your room. Start in one corner and go to the other. Do you feel the pressure differences? You will. If you need verification, take a radio shack SPL meter, they call it decibel meter and look for the dB increases. You will have increases from +2dB to +10dB, maybe even + 15. Use your own hearing, verify with the meter. Mark with tape on the wall location. Try to find the “physical” location of the pressure. It is not easy, but with a few tries, you will get it. Shut the lights out to eliminate vision. Trust your ears and bone conductance. You are the one who must work and play in this room. It’s very critical to the acoustical life of your room, to get this part right.
Step 3 – Choose Treatment Technology
When treating room resonances, the best way is to tear down the existing room and build another which has more suitable dimensions that will minimize room modal issues. No worries, just kidding. Most of us can not do that, so we must place powerful, low-frequency sponges to absorb the excess room pressure at these modal locations within our existing rooms. Remember, you measured +10 dB and maybe even +15 dB pressure points in the room. You can not stop this amount of energy without a high rate and level of absorption technology. Boxes filled with building insulation will not work for low-frequency pressure management.
Treatment Options Available
Only two types of existing room treatment will accomplish this acoustic absorption goal. Helmholtz resonators and diaphragmatic absorbers. Helmholtz resonators are inefficient and hard to calculate. They have a narrow bandwidth and you need many units to treat surface areas. Use diaphragmatic absorption to provide the absorption horsepower you really need. You can build it into each studio wall. You can build this same technology yourself and build it in a freestanding, portable, easy to position unit. You can find build plans, assembly instructions, tool and material list, and even a cut sheet to show you and how big or small to make each piece: https://acousticfields.com/d-i-y-acoustic-treatments/
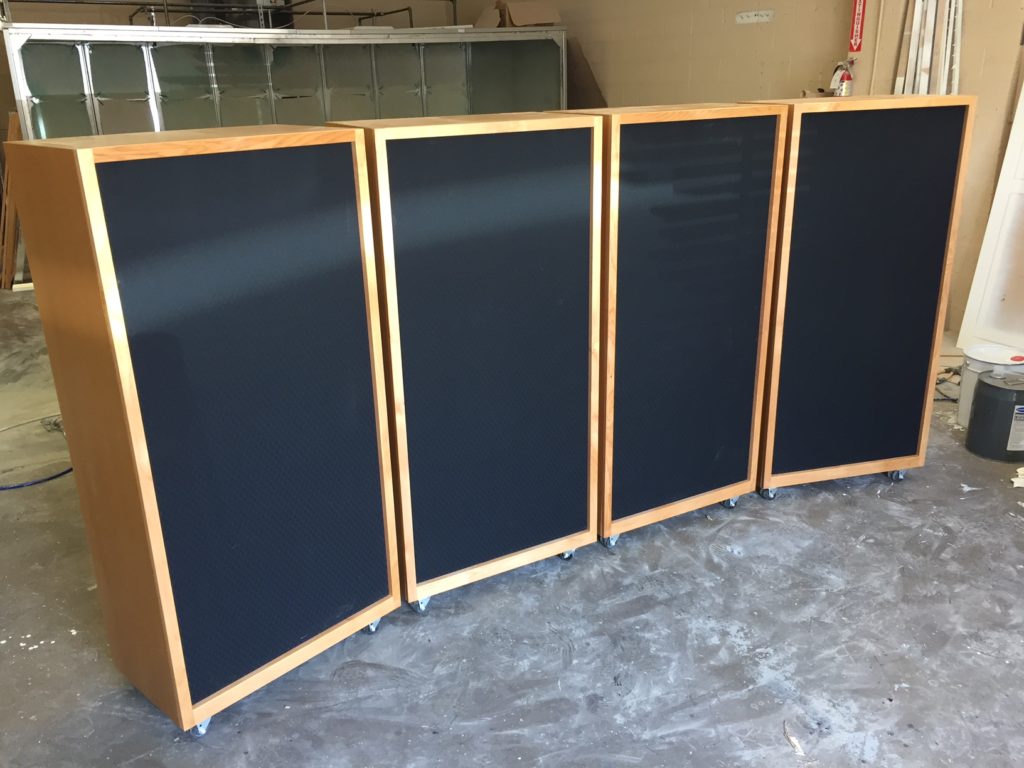
Acoustic Fields Diaphragmatic Absorbers
Step 4 – Installation
Diaphragmatic absorbers that you can build have the same technology as our production units You can build the same unit the pros use in their new studio walls or you can use freestanding units. It’s always about surface area coverage. You must use the correct technology at the correct room locations. Since the walls are causing the problem, let’s build the technology into the walls. You can also build free-standing units that are broadband absorbers from 35 Hz. – 200 Hz. Since they are broadband, you can use one for all room modal positions. Make them out of solid wood, stain them, paint them, you decide and then make it so. With over 30 fabric choices and colors, fitting the decor of your room will be easy. Locate your tape marks and then place a unit at those locations.
New Build Using Our Carbon Technology: https://acousticfields.com/very-dedicated-listening-piano-rooms/
Step 5 – Critical Listening
Once you have located the unwanted pressure issues by pressure mapping your room with a sine wave generator you can then walk around the room and listen to the pressure differences after your absorbers have been installed. Put your ear next to the new absorber you just built and installed. Listen to the differences. Listen sitting in your chair. You may need to remove some of those units. You may need to add more. Only listening over time will tell. You are now on your way to making sure everything is heard in your room.
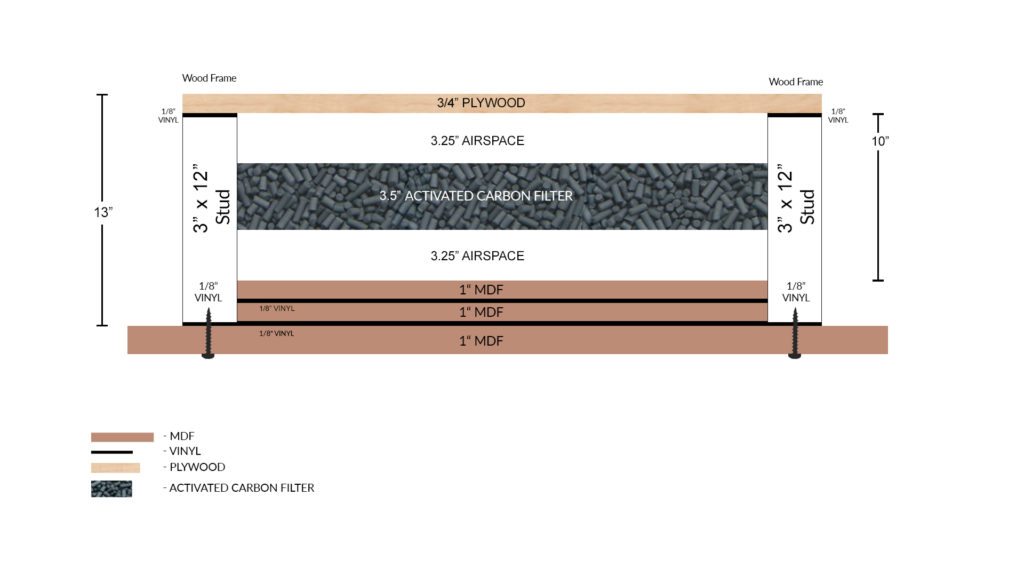
Absorber Wall Barrier
Step 6: Room Form: An Easier Way
You can also fill out the room form that we offer in our free room analysis. Once you send us the data on your room, we then compare your room dimensions and usage with our database of over 150 built and measured rooms. We will be able to identify the frequency and amplitude (strength) of your problems and just as important the location of these issues within your room. Are you 30 – 50 Hz. issues on the sidewalls or are they on the front and rear walls. Are your 40 – 80 Hz. issues on the front and rear walls or are they located between the floor and ceiling. Every room size and usage will produce a different set of frequency issues.
Step By Step
By following steps 1-5 covered above, you can now identify your room low-frequency noise issue and then find its location. You can then build your own professional-grade, diaphragmatic absorber that will absorb over a broad range of low frequencies. An absorber that will perform equally or better than if you built your own new studio and planned for the proper resonance control. Go get your build plans, assembly instructions, tool and material list, and cut sheets at https://acousticfields.com/d-i-y-acoustic-treatments/.


HI Mike,
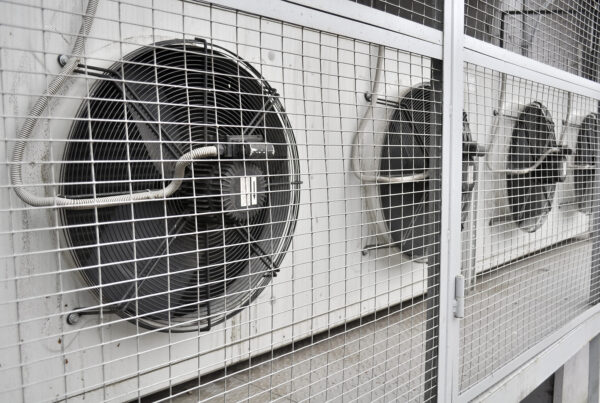
i am having problem to sleep in my new apartment due annoying constant low frequency sound in my bedroom. do you know how can i get rid of this sound?
thanks for your advice
K, You must measure the noise frequency and amplitude of the noise and then build the appropriate barrier based upon the noise measurements.
Room modes?
You mean nodes, right? Or are you talking about something else?
Just want to make sure I understand.
Room modes